
WizBeam Field Service documentation
The complete guide to WizBeam Field Service: jobs, scheduling, the dispatch board, technicians on their phones, quotes and invoices, payments, customer statements, expenses and reports. Every part has a Copy link button, so you can send someone exactly the part they need.
Overview
WizBeam Field Service is a web-based field service management system for businesses that send people to work at a customer's location: air conditioning and refrigeration, plumbing, electrical, appliance repair, cleaning, pest control, IT support, solar, CCTV, generators, elevators and facility maintenance.
It runs in any modern browser on a computer or phone — nothing to install. Every job is one record that carries its customer, address, schedule, technician, charges, payments and history.
What you can do
- Create jobs (work orders) with a priority and a clear status.
- Assign technicians and time slots, with double-booking refused automatically.
- Give technicians a login that shows only their own jobs, on their phone.
- Add services, labour and parts to a job and print a quote or invoice.
- Record full or part payments — by cash, card, bank transfer or wallet — and see what is still unpaid.
- Download a statement for any customer, and print invoices on A4, A5, Letter, Legal or receipt paper.
- Read reports on jobs, revenue and technician performance.
Picking a customer, technician or service — just type
Every place where you choose a customer, technician or service (and every longer list) is a search box: click it, start typing part of a name, email, phone number or code, and pick from the matches with the mouse or the arrow keys and Enter. Phone numbers match with or without the leading 0 or country code. You never need to scroll through a long list.
Getting started: set up your business
- Create your account on the registration page: business name, your name, business type, email, phone, address, country, city and a password of at least 8 characters. No card is needed. We then email a 6-digit code to the address you entered: type it on the next screen and the account is created (the code works for 30 minutes; click Send a new code if it does not arrive, and check your spam folder). Nothing is created until the email is confirmed.
- You are then signed in on the free Starter plan, with three starter services in your catalogue: Site visit / inspection, Standard service call and Installation.
- Set your currency, default tax rate and invoice footer under Settings.
- Price your services under Services, or add your own.
- Add your technicians — including yourself if you do jobs.
- Create your first job, assign it, complete it, print the invoice and record the payment.
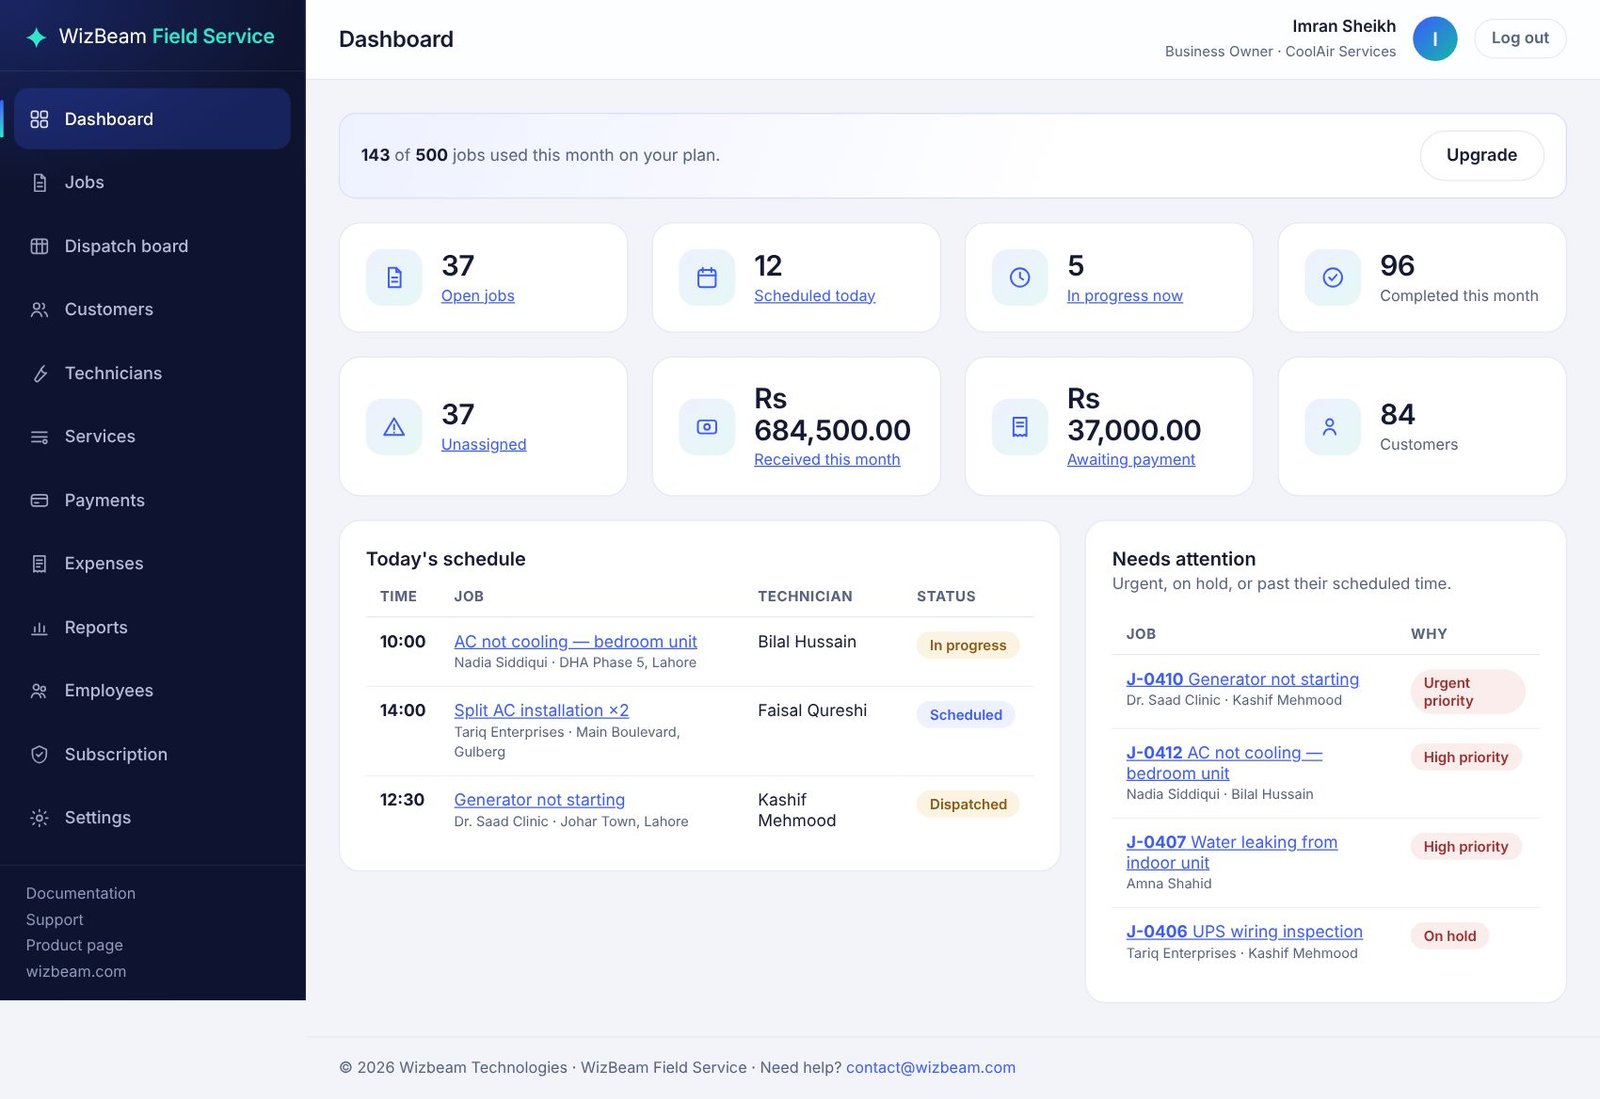
The dashboard shows this checklist until your first job exists. After that it shows open jobs, jobs scheduled today, jobs in progress now, jobs completed this month, unassigned jobs, money received this month, the amount awaiting payment and your number of customers, with today's schedule and a Needs attention list (for example jobs on hold). It also shows how many jobs your plan allows this month. Technicians see their own jobs.
Signing in
Sign in at /solutions/field-service-operations-management-system/login/. After five wrong attempts, sign-in is paused for 15 minutes to protect the account.
Jobs
The Jobs page lists every work order with its customer and city, technician, time, status and any amount due. Filter by open jobs, scheduled today, with balance due, all jobs, any single status, or by technician — including unassigned. Search by job number, title, customer or address. Urgent and high-priority jobs are listed first. Users with report access can download the list as CSV (it shows the customer's city, never their phone).

Create a job
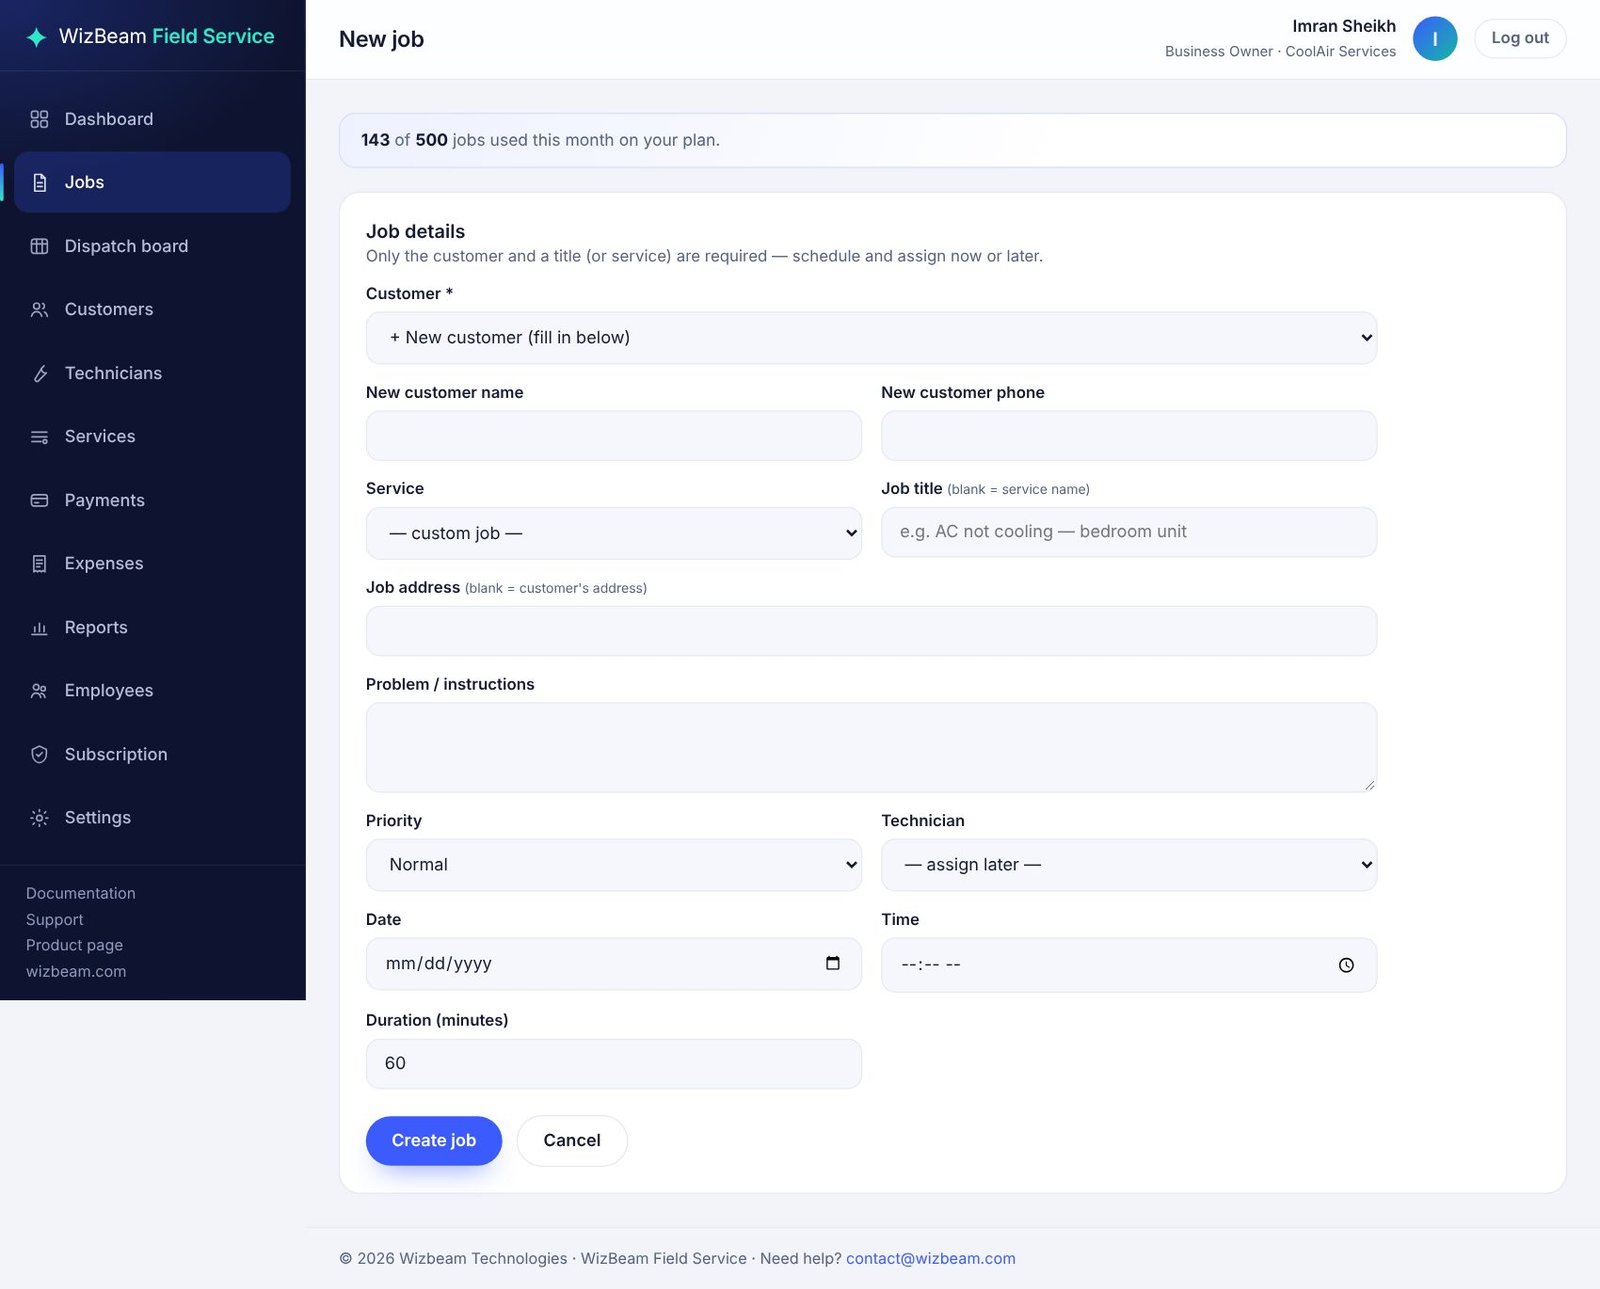
Click New job. Only a customer and a title (or a service) are required.
- Customer: pick an existing customer, or leave it on New customer and type their name and phone — the customer is created with the job.
- Service: choosing a service fills in the title and duration and adds its price as the first charge.
- Address: leave blank to use the customer's address.
- Priority: Low, Normal, High or Urgent.
- Problem / instructions: what the technician needs to know.
- Technician, date, time and duration: set them now or later. To schedule, enter both a date and a time.
Each job gets a number (J-0001, J-0002…). On plans with a monthly job limit, the count resets on the 1st of each month.
Working a job from start to finish
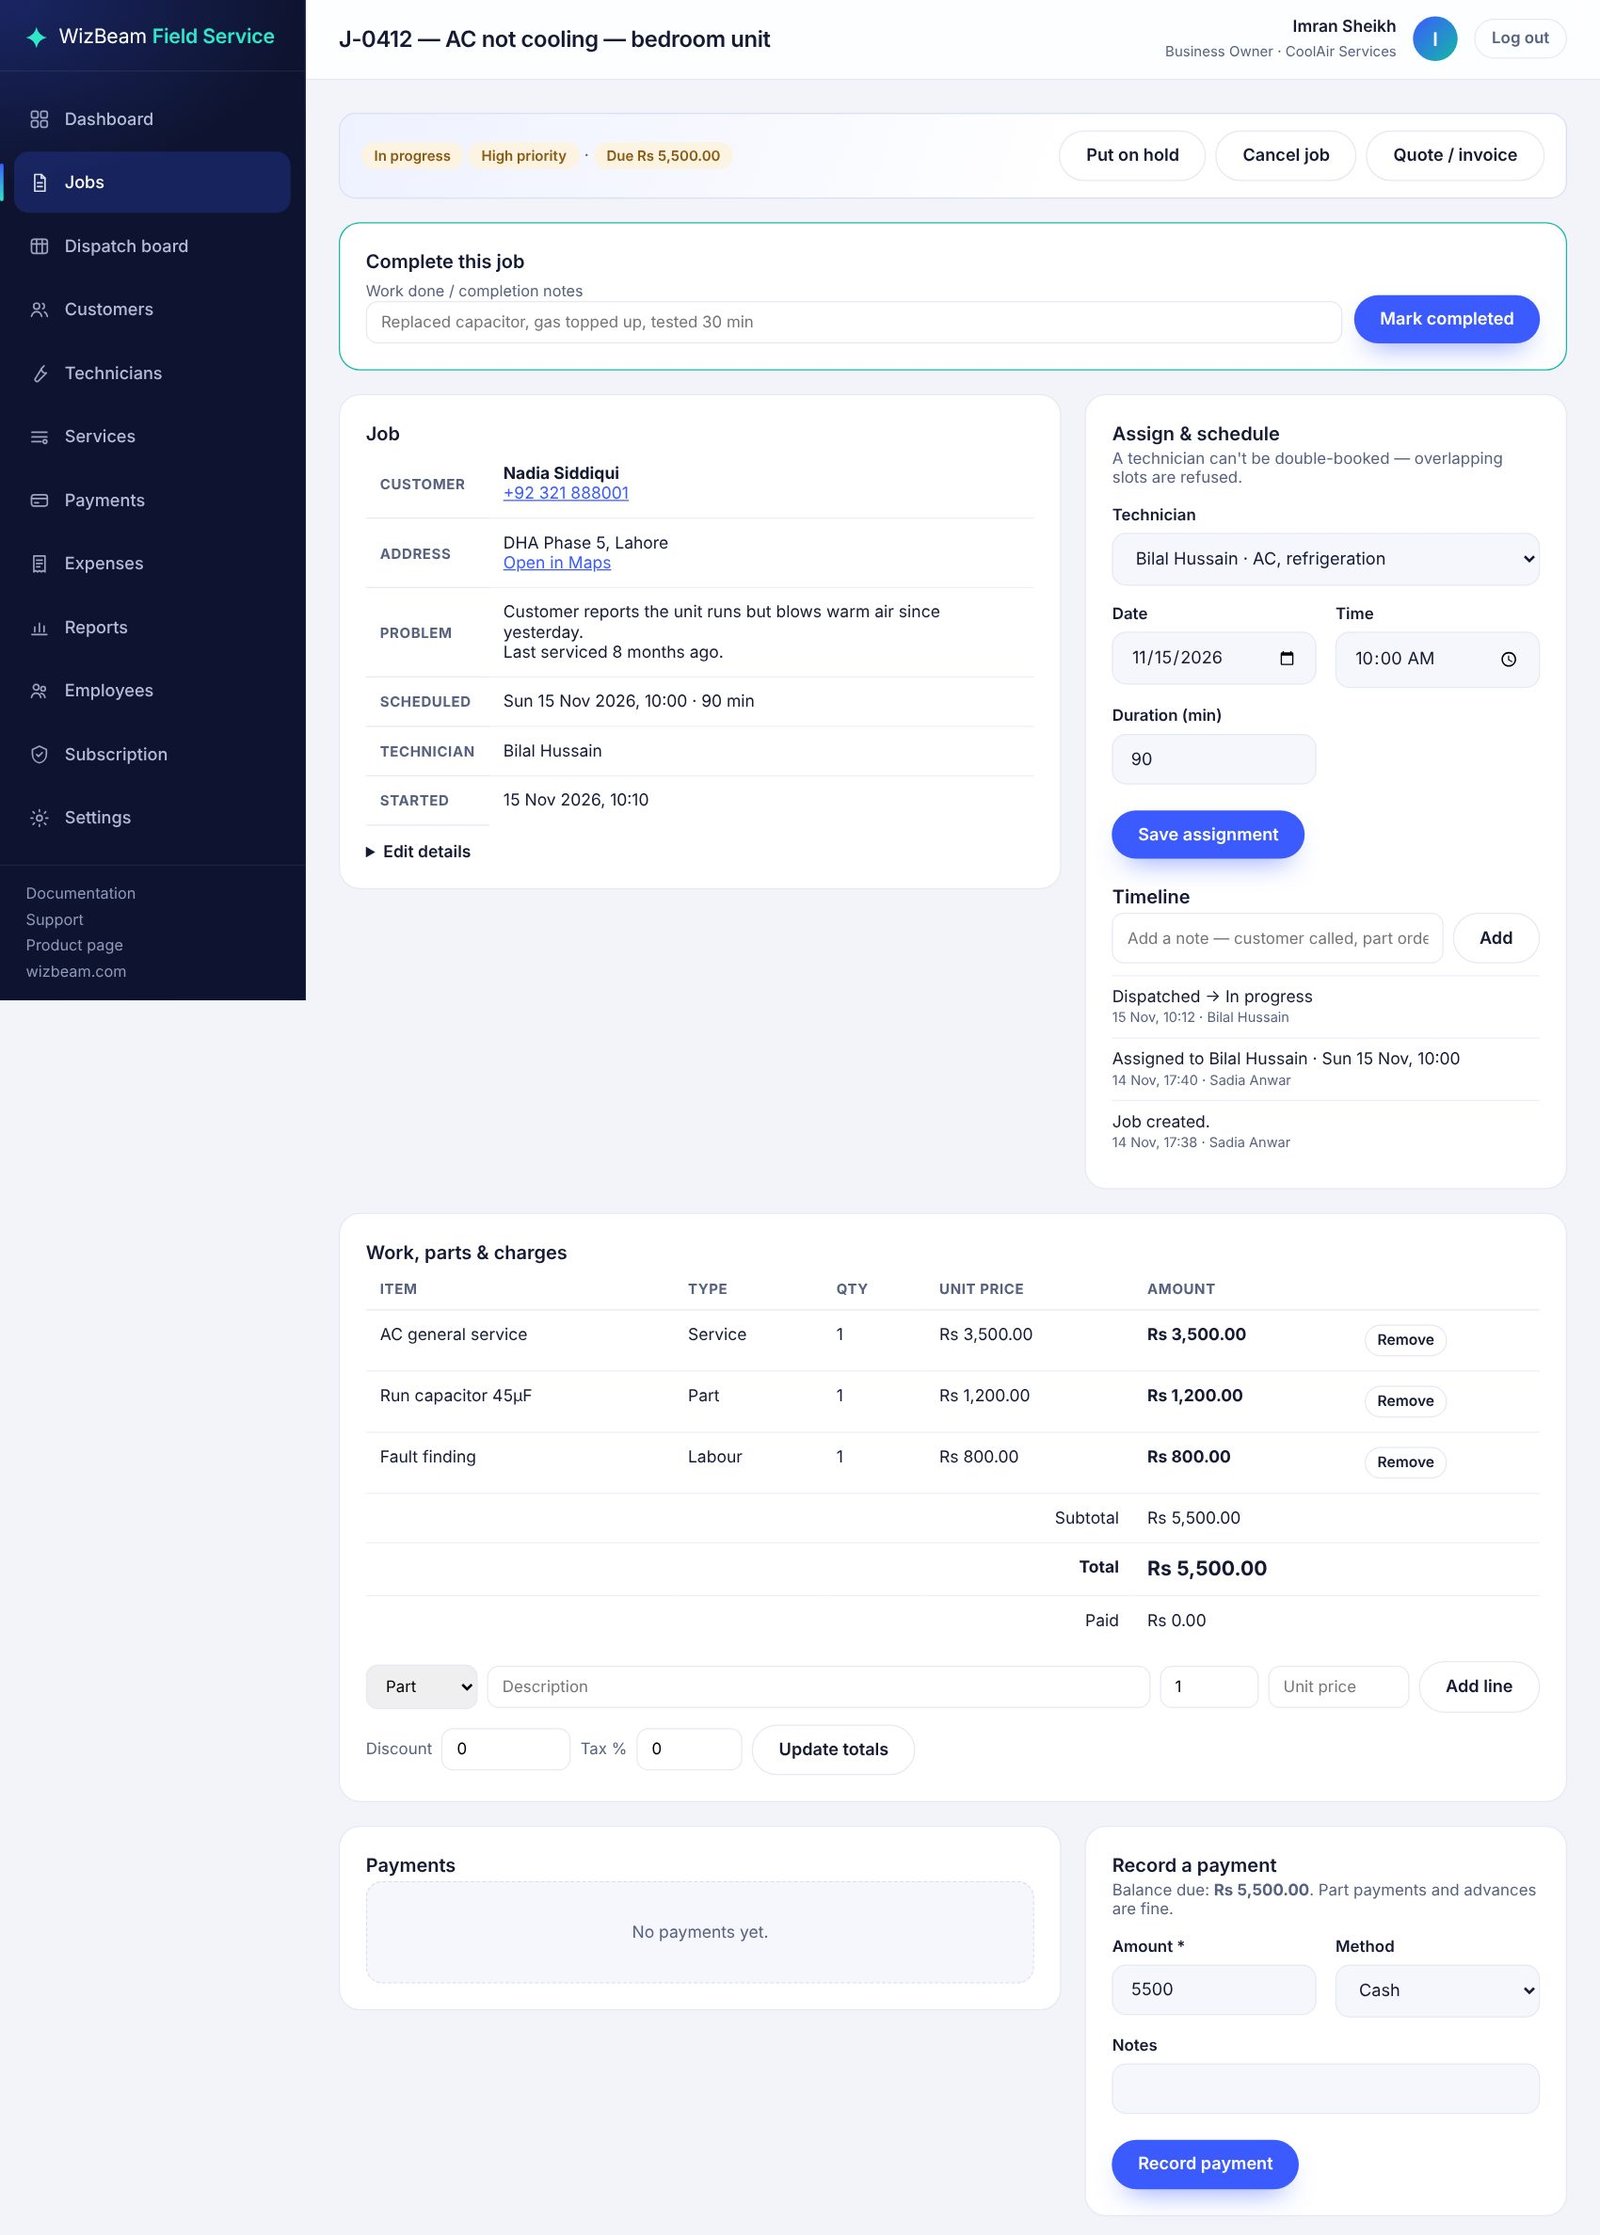
Open a job to see everything about it on one page.
Job statuses
| Status | Meaning | Next steps available |
|---|---|---|
| New | Created, no time slot yet | Schedule, dispatch, start, cancel |
| Scheduled | Has a date and time | Dispatch, start, hold, cancel |
| Dispatched | Technician is on the way | Start, hold, back to scheduled, cancel |
| In progress | Work has started | Complete, hold, cancel |
| On hold | Waiting for a part or the customer | Reschedule, resume, cancel |
| Completed | Work finished | Final — invoice and collect payment |
| Cancelled | Will not be done | Final |
The buttons at the top of the job only offer the moves that are allowed from the current status. A technician must be assigned before a job can be dispatched, started or completed, and a job with payments recorded cannot be cancelled.
Assign and schedule
Under Assign & schedule, choose a technician, date, time and duration and click Save assignment. If that technician already has a job overlapping the slot, the system refuses it and asks you to choose another slot or technician.
Charges
Under Work, parts & charges, add lines of type Service, Labour, Part or Other with a quantity and unit price, and Remove a line added by mistake. Set a discount and tax rate below the table and click Update totals. Technicians can add the parts they used while on site.
Job details
Click Save details after changing the job's title, address, problem / instructions or priority.
Complete
When the work is done, type what was done in Complete this job and click Mark completed. The start and completion times are recorded and used in reports.
Timeline
Every status change, assignment and payment is added to the job's timeline with the user and time. Add your own notes — “customer called”, “part ordered” — at any point.
Quotes, invoices and payments
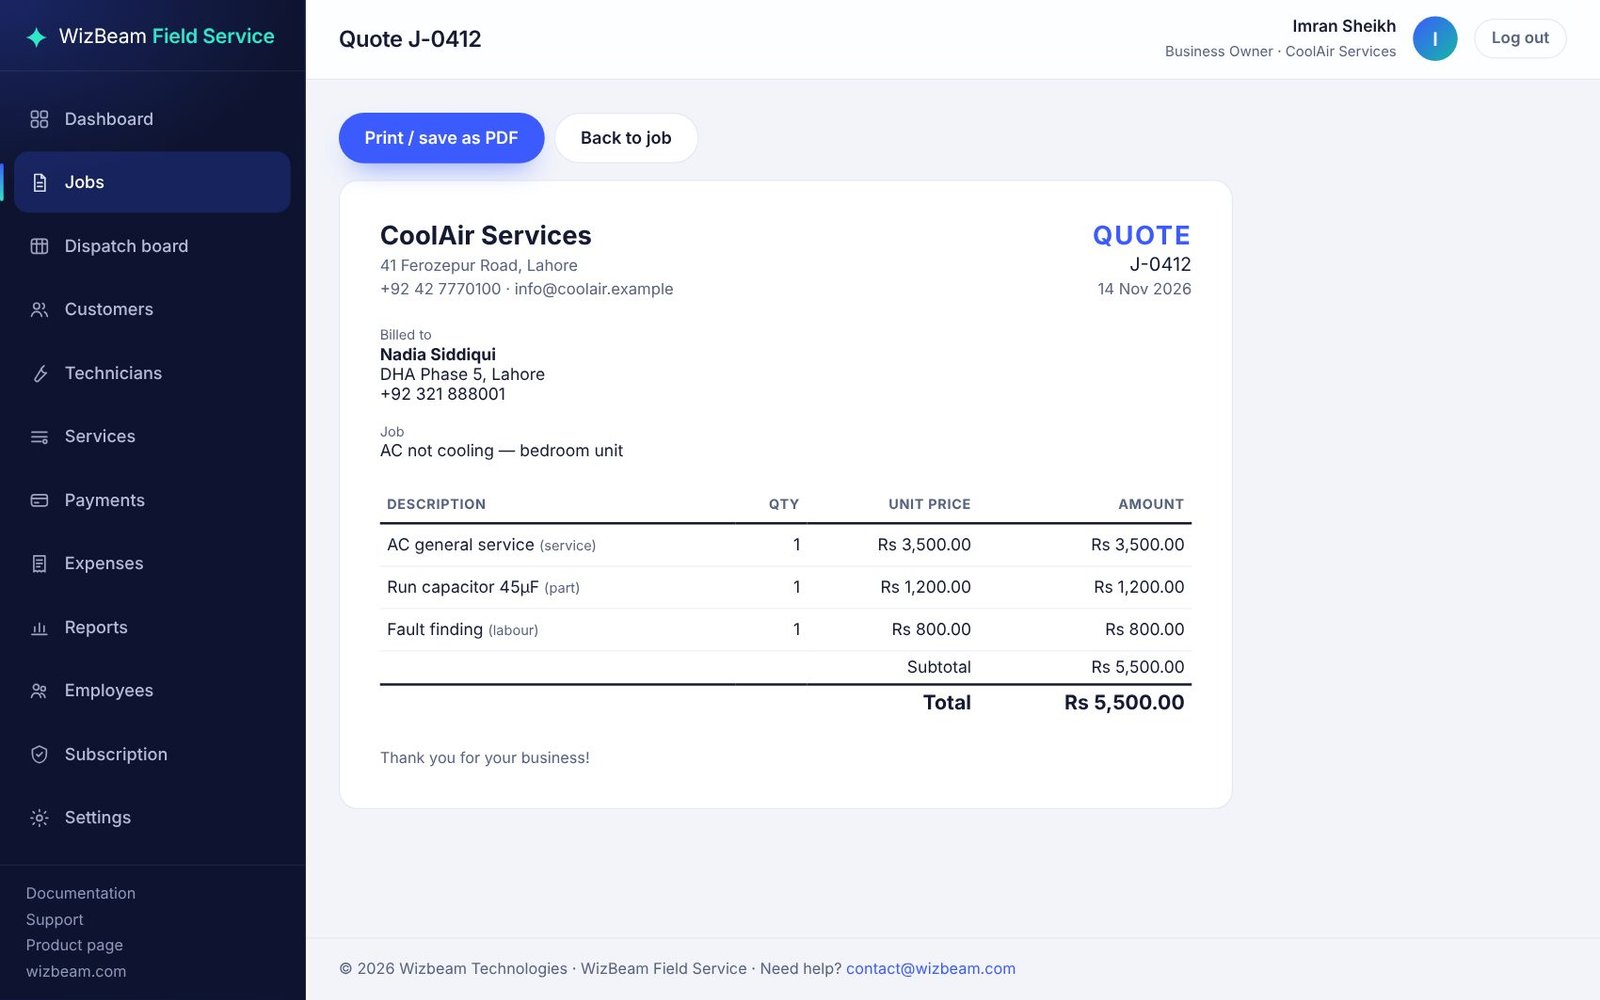
Click Quote / invoice on any job to open a printable document. Before the job is completed it is titled Quote; once the job is completed or a payment has been recorded it becomes an Invoice showing each payment (date, receipt number and method) and the balance due. It shows your business details, the customer's name, company and city — never their phone number — the job, the charges and your invoice footer.
Choose the paper size in the Paper menu, then click Print / save as PDF. See Printing and paper sizes.
Record a payment
On the job page, enter the amount, the method (cash, card, bank transfer, online / wallet or other) and a note under Record a payment. For bank transfers and wallets, choose which bank or wallet received the money. Each payment gets a receipt number (R-0001…). Part payments are fine.
Payments larger than the job
When a customer pays more than the balance on this job, the extra pays their other unpaid jobs, oldest first. Each part gets its own receipt number and a note on the job's timeline. The amount cannot be more than the customer owes across all their jobs; the form tells you the maximum if you go over.
The Payments page
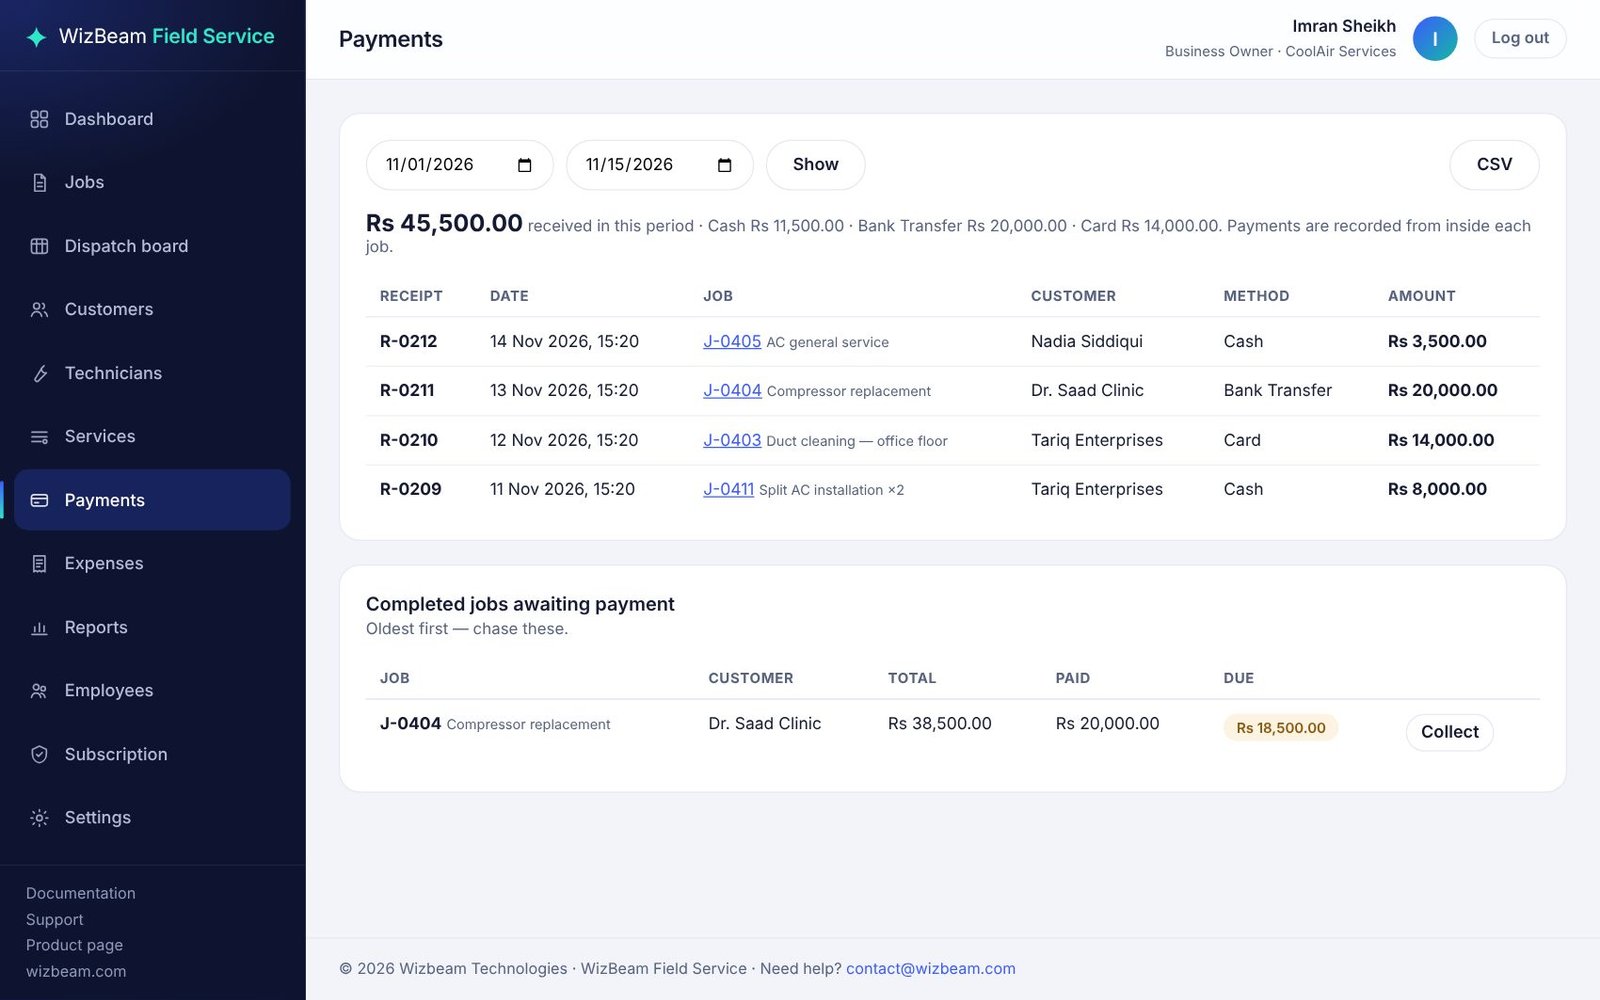
The Payments page lists everything received in a date range, totals by method, completed jobs still awaiting payment (oldest first), and a CSV export.
Banks and wallets
When a customer pays by bank transfer or online / wallet, staff choose which of your banks or wallets received the money.
Add your banks and wallets
Under Settings → Banks & wallets, enter a name (for example Meezan Bank, HBL, JazzCash or Easypaisa), choose Bank account or Mobile wallet, and optionally add details such as the last four digits. You can keep up to 50. Hide one you no longer use — past payments keep showing it.
Choosing the account when taking a payment
Choose Bank transfer or Online / wallet on the job's payment form and a Received in list appears. Once any banks or wallets are set up, the payment cannot be saved without choosing one. Invoices and statements then show, for example, Bank transfer · Meezan Bank. Account details are only shown to your staff.
Your active accounts are also shown under How to pay on the link your customers receive (see WhatsApp messages and links), so keep the details complete — account title, number or IBAN, and wallet number.
Printing and paper sizes
Quotes and invoices print on the paper you use. Next to the print button, choose the Paper size: A4, A5, Letter, Legal, or receipt paper 80 mm or 58 mm for a portable printer. The preview changes immediately; on receipt paper the layout narrows and the header is centred. The page remembers the last size you used in that browser.
The dispatch board (Professional and Enterprise)
The Dispatch board shows one day at a glance: a column for each technician with their jobs in time order, a column for jobs that have a time but no technician, and below it the queue of jobs waiting to be scheduled, urgent first.
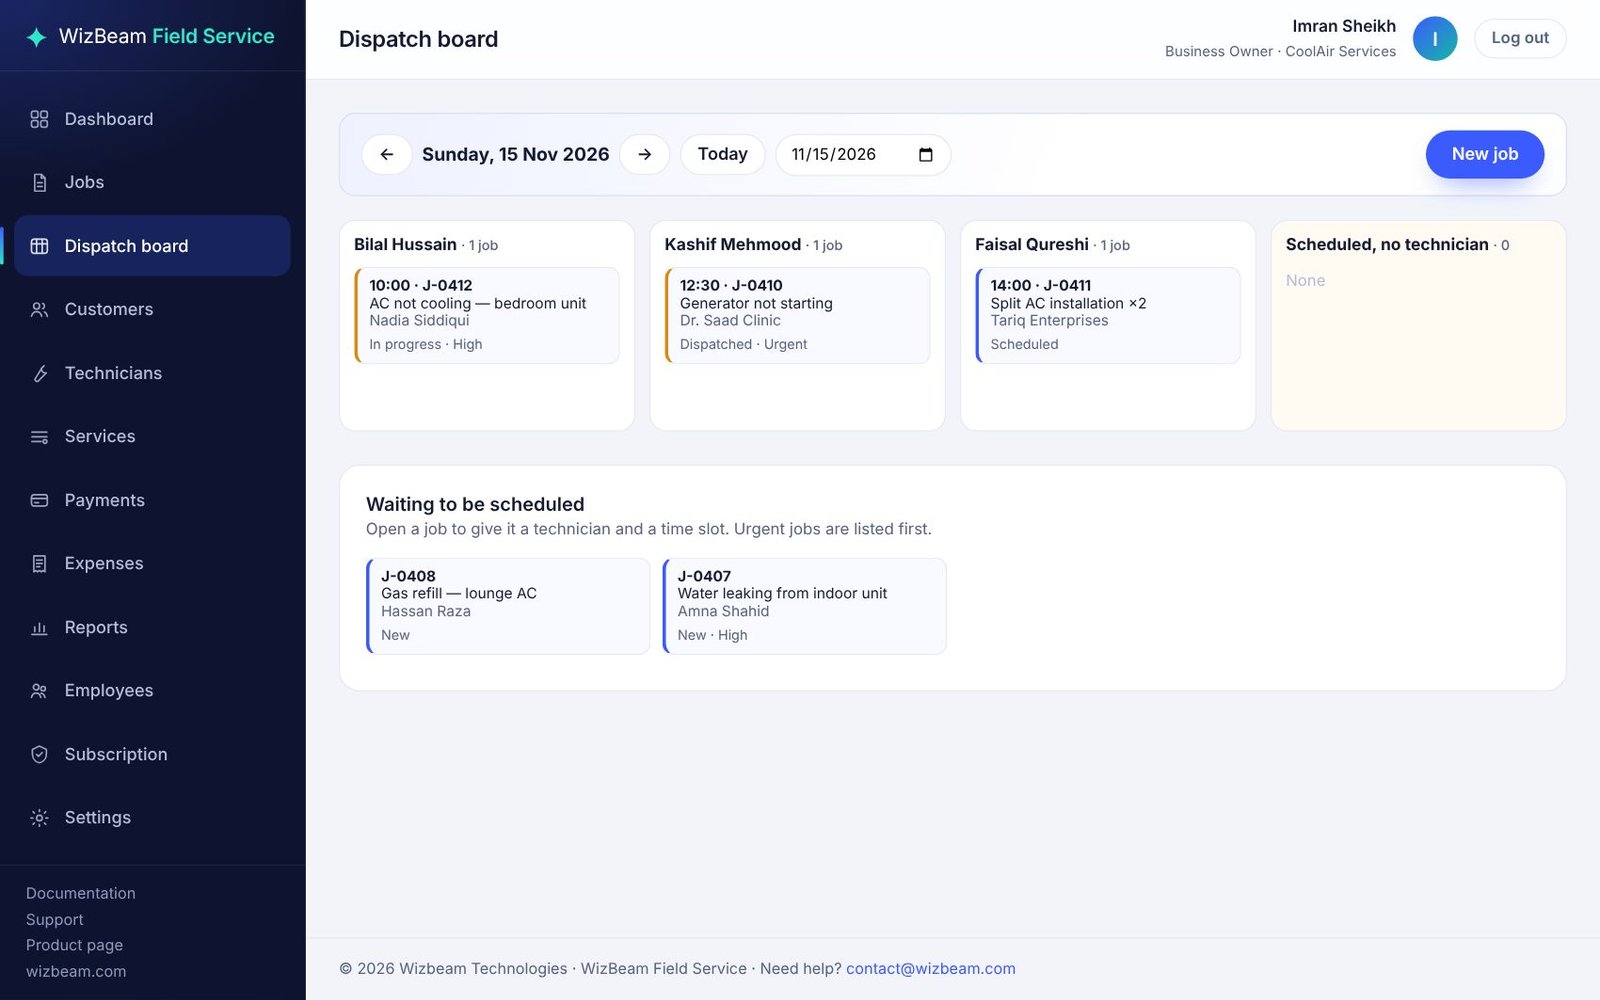
Use the arrows or the date picker to move between days. Click any job to open it and assign or reschedule.
Customers
Customers is your contact book: name, company, phone, email, address, city and notes such as a gate code or preferred times. Search by name, company, phone or address. Each customer shows their number of jobs and any outstanding balance. Click the job count to see their full job history, or New job to start one for them.
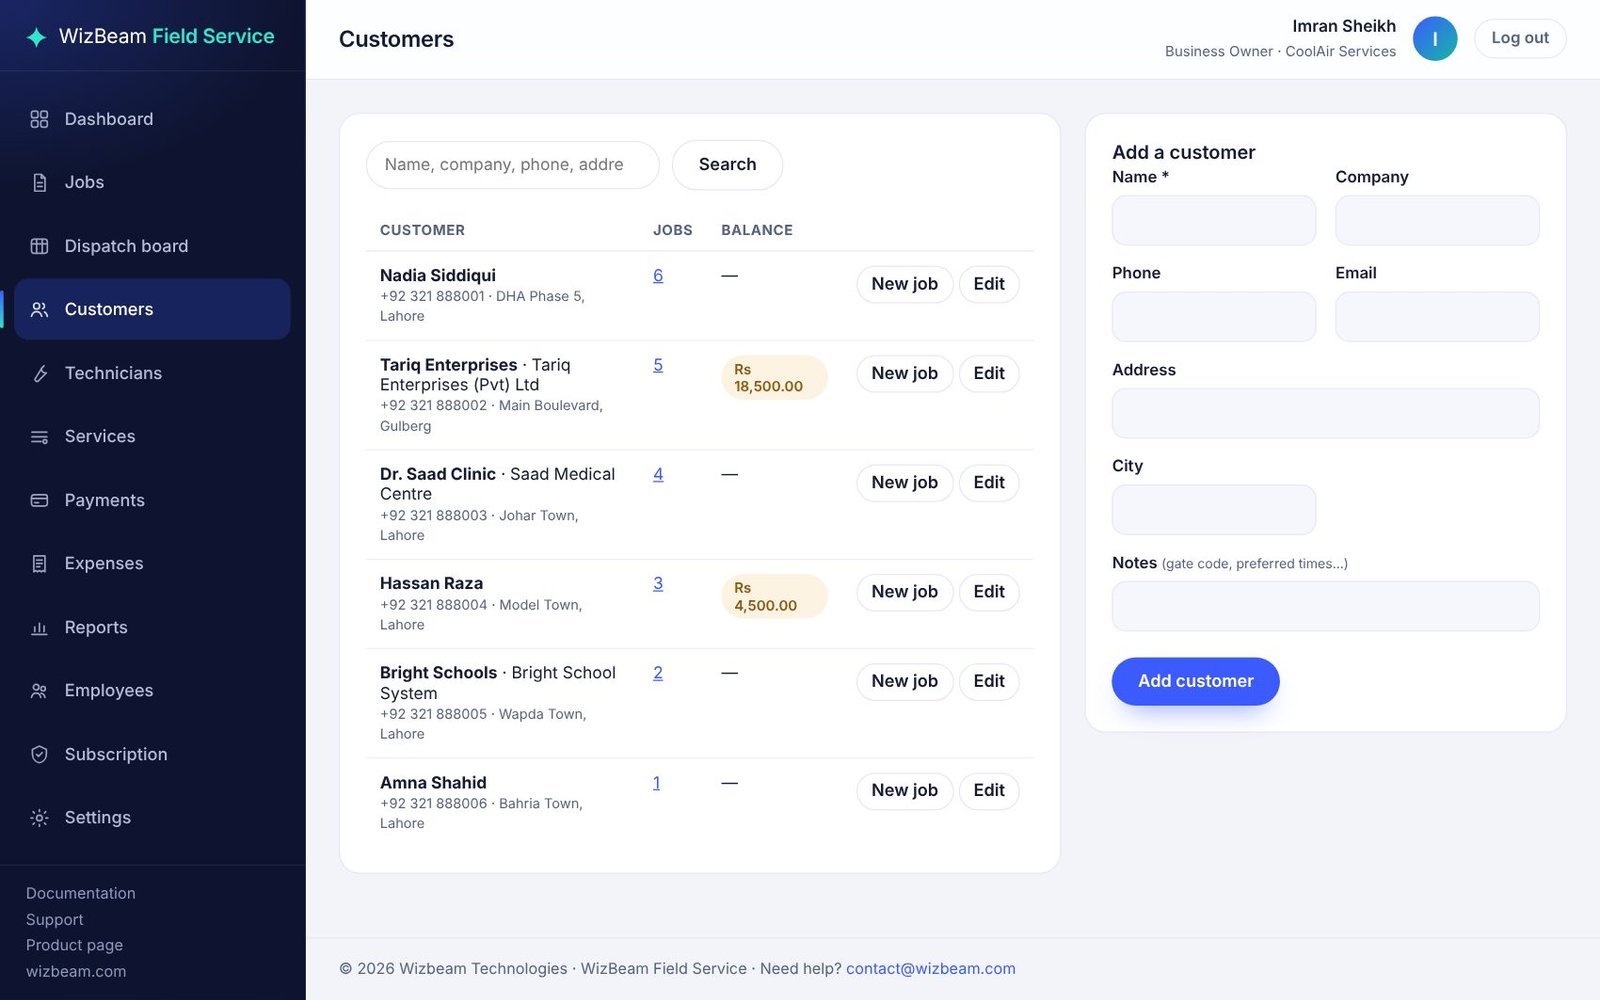
Archive a customer you no longer serve; their history is kept.
Customer statements (PDF)
Click Statement beside a customer to download a PDF statement: your business details, the customer's name, company and city, every job charged and every payment with its receipt number and method (with bank or wallet), and the running balance, ending with the balance due. Every download is recorded in the activity log.
Technicians and phone access
Add each field technician under Technicians with their name, phone, email and skills. The page shows how many technicians your plan allows. The list shows each technician's active jobs and jobs completed this month.

Giving a technician their own login
- Under Employees, add the person with the Technician role and a password.
- Under Technicians, edit their profile and choose that login in Linked login.
- The technician signs in on their phone at the same address you use.
A technician sees only the jobs assigned to them. From a job they can tap the customer's number to call, open the address in Maps, start the job, put it on hold, add parts and labour, add notes and mark it completed. They cannot see other technicians' jobs, cancel jobs, or change prices already entered.
A technician with active jobs cannot be deactivated until those jobs are re-assigned.
Services
The service catalogue is the list of work you offer, each with a default price and duration. Choosing a service when creating a job fills in the title and duration and adds the price as the first charge — which you can still change on the job.
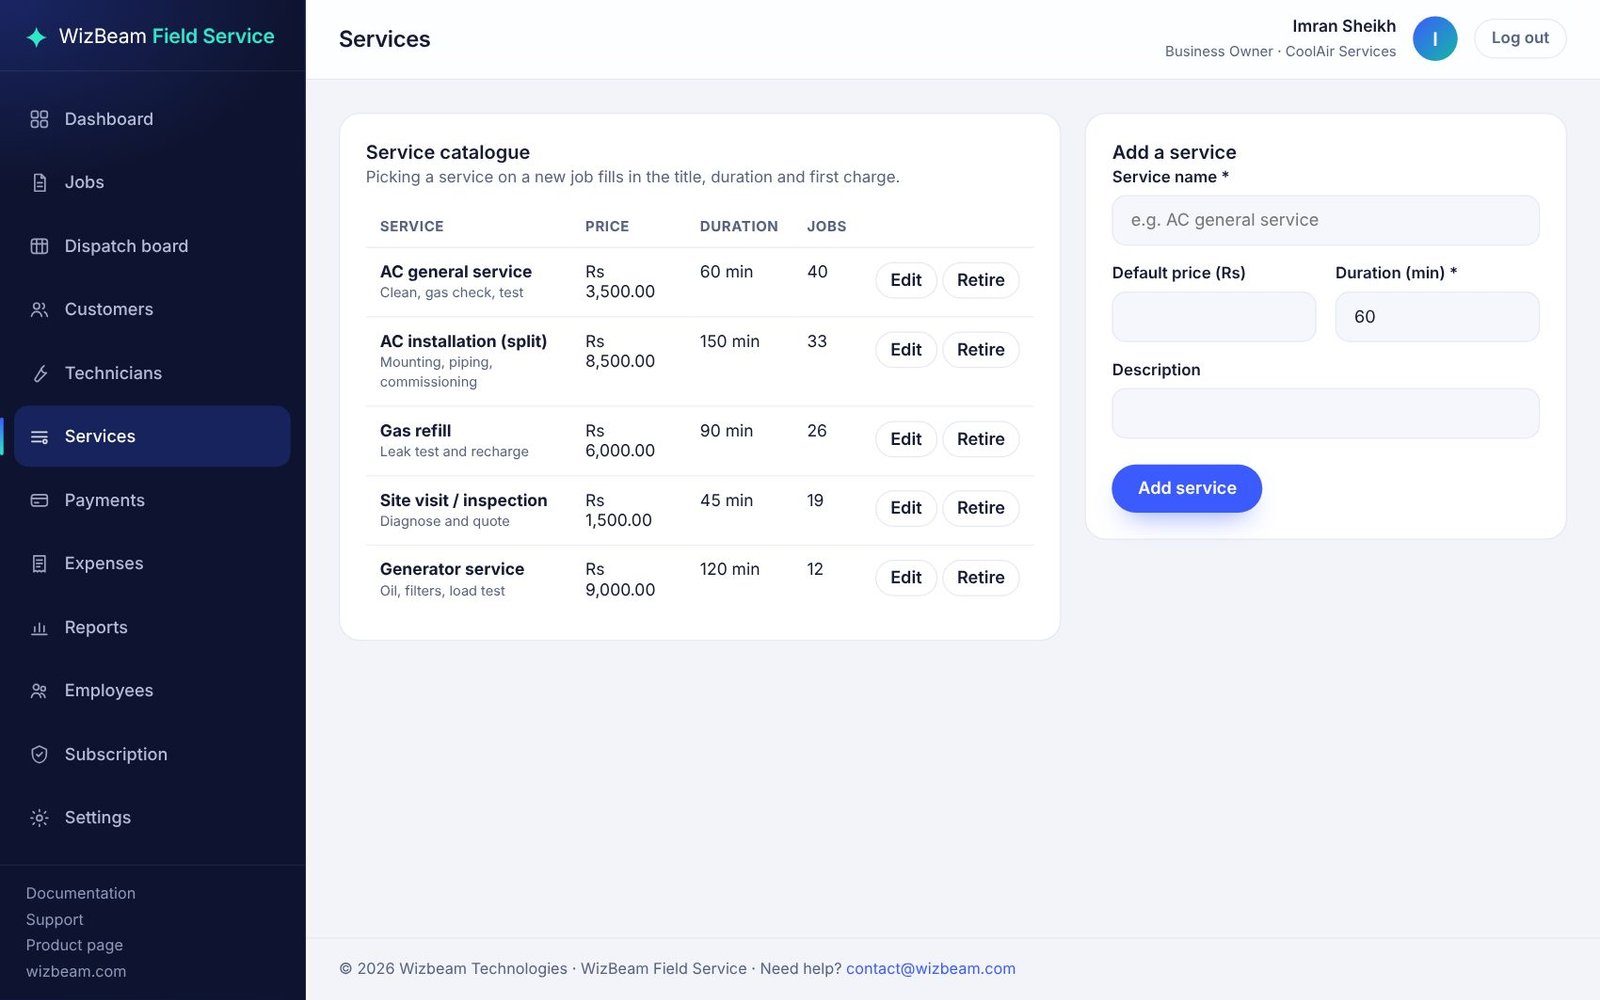
Each service has a name, a default price, a duration in minutes and a description. Changing a service price affects new jobs only. Retire a service to stop offering it without changing past jobs.
Employees, invitations and the activity log
Invite a team member
Under Employees, the owner clicks Invite a team member and enters the person’s name, email, phone and a role — no password. We email them a link to set their own password (it works once, for 3 days). After that they sign in at the normal sign-in page (or your own sign-in page with white label) with their email and that password. Until then the list shows Invitation sent; open the person to Resend invitation. If the email cannot be sent, the link is shown to you so you can pass it on yourself. The page shows how many team accounts your plan allows. For a technician who should see only their own jobs, give them a role without See every job and link their sign-in to their profile on the Technicians page.
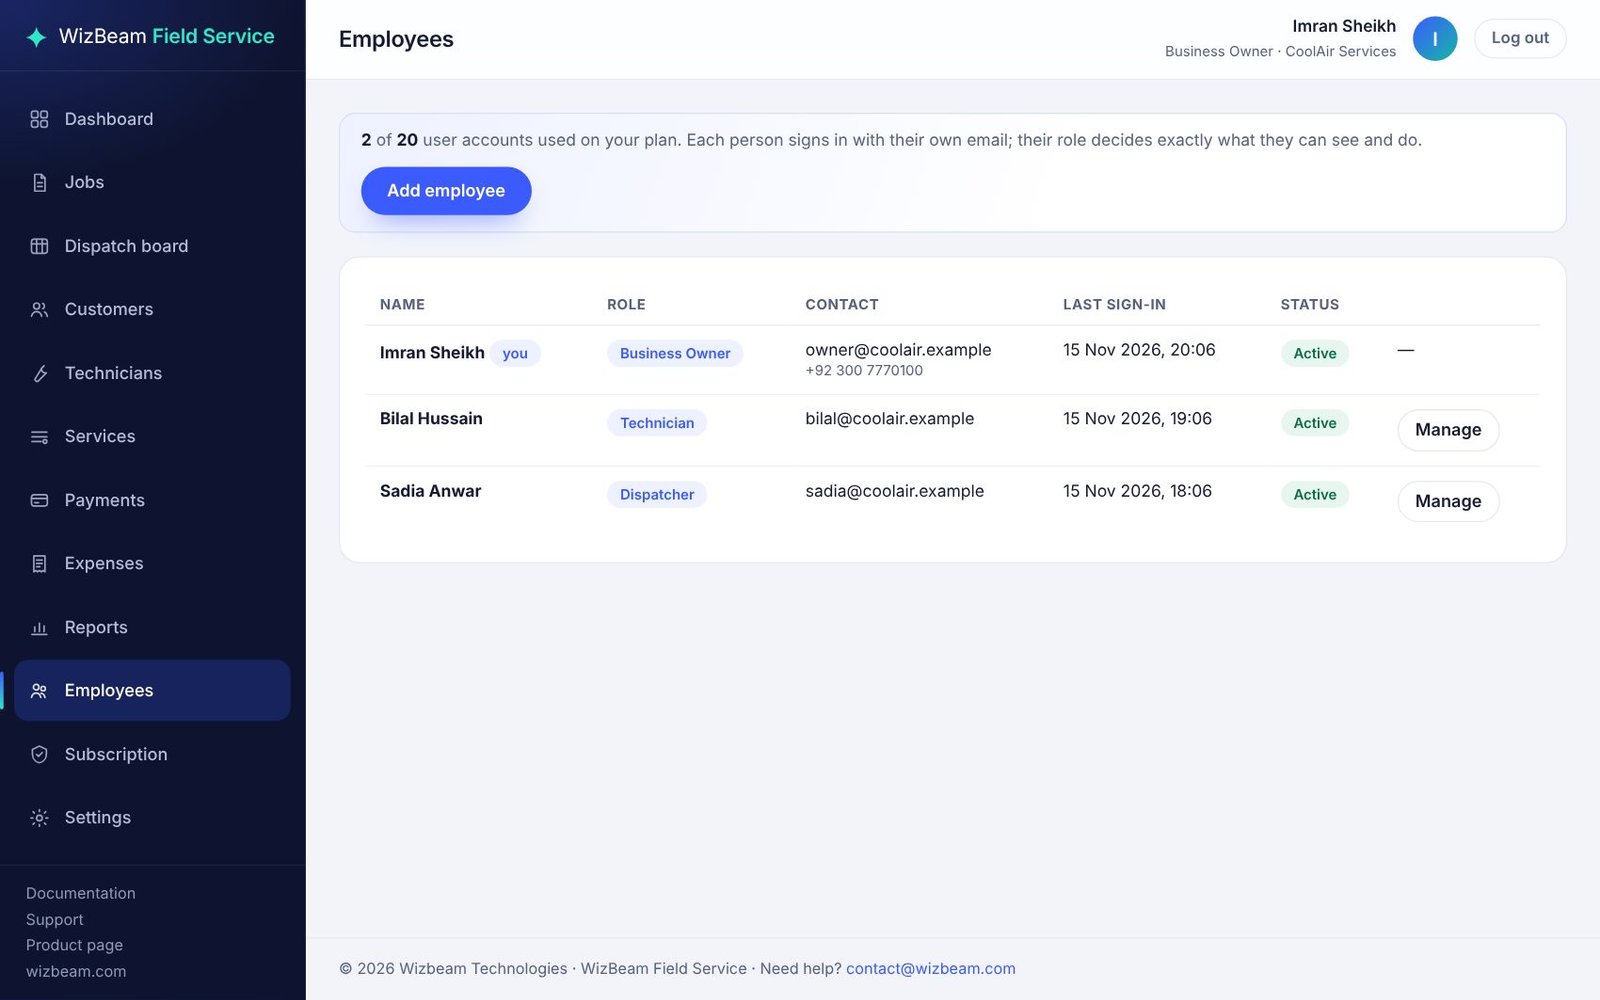
Change a role, send a password link or disable an account
Open a team member to change their name, role or phone; Email a password link when they forget their password (valid 24 hours — you never see or set anyone’s password); or disable the account when someone leaves, which signs them out at once and cancels any open link. Re-enabling is refused if it would exceed your plan’s limit. The list shows when each person last signed in.
Activity log
The Activity log (owner and administrators) lists who did what and when — sign-ins, jobs, payments, statement downloads and settings changes. Entries cannot be edited or deleted.
Expenses and reports
Expenses: rent, utility bills, fuel and every running cost
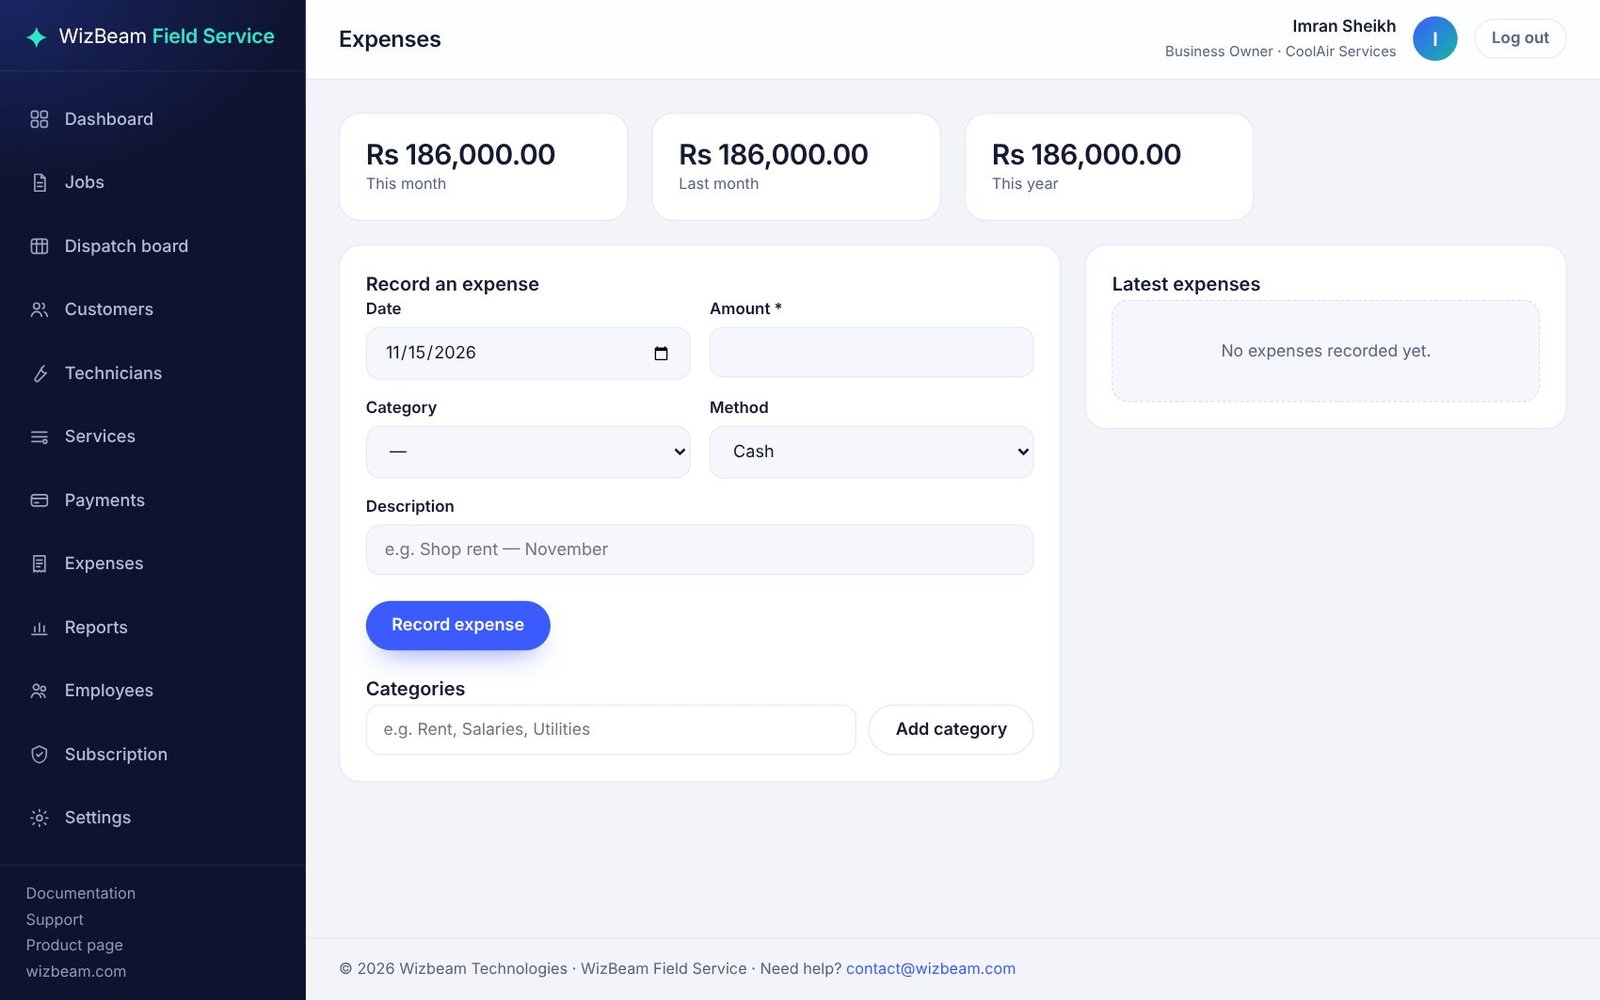
Open Expenses in the menu to record what the business pays, so the monthly reports show the real profit. It comes with ready-made categories in groups — Premises (rent, building repairs, security and cleaning), Utilities (electricity, gas, water, internet and phone, generator fuel), Vehicles & travel (fuel, vehicle maintenance), Staff (salaries and wages) and Running costs (supplies, marketing, software, insurance, taxes and fees, bank charges), plus tools, parts & materials and subcontractors. Add your own under Categories, rename them, or hide the ones you do not use.
For each expense enter the category, amount, the date you paid, and For month — the month the cost belongs to. Paying October’s electricity bill on 5 November? Set For month to October and it counts in October’s figures, not November’s. You can also note who you paid, the bill number and payment method, and attach a photo or PDF of the receipt (taken straight from a phone camera). Every expense can be edited or deleted later; filter a month by category or search by who you paid or the bill number.
Monthly bills
Under Monthly bills, enter the costs that come every month once:
- Same amount every month — rent, salaries, an internet package: recorded by itself on its due day each month (also for months nobody signed in).
- Changes every month — electricity, gas, water, fuel: from the start of each month it waits on the Expenses page, and the dashboard reminds you, until you type in the amount from the bill (or click Skip this month).
Monthly report
Monthly report shows 12 months side by side: income, direct costs, every expense category grouped (with a total for utilities and the other groups), total expenses and net profit for each month, with the latest month first in view. Choose the last month to show and click Download CSV for your accountant. The Reports page uses the same figures and links to it.
Income in the monthly report is the value of jobs completed in the month, paid or not.
Reports
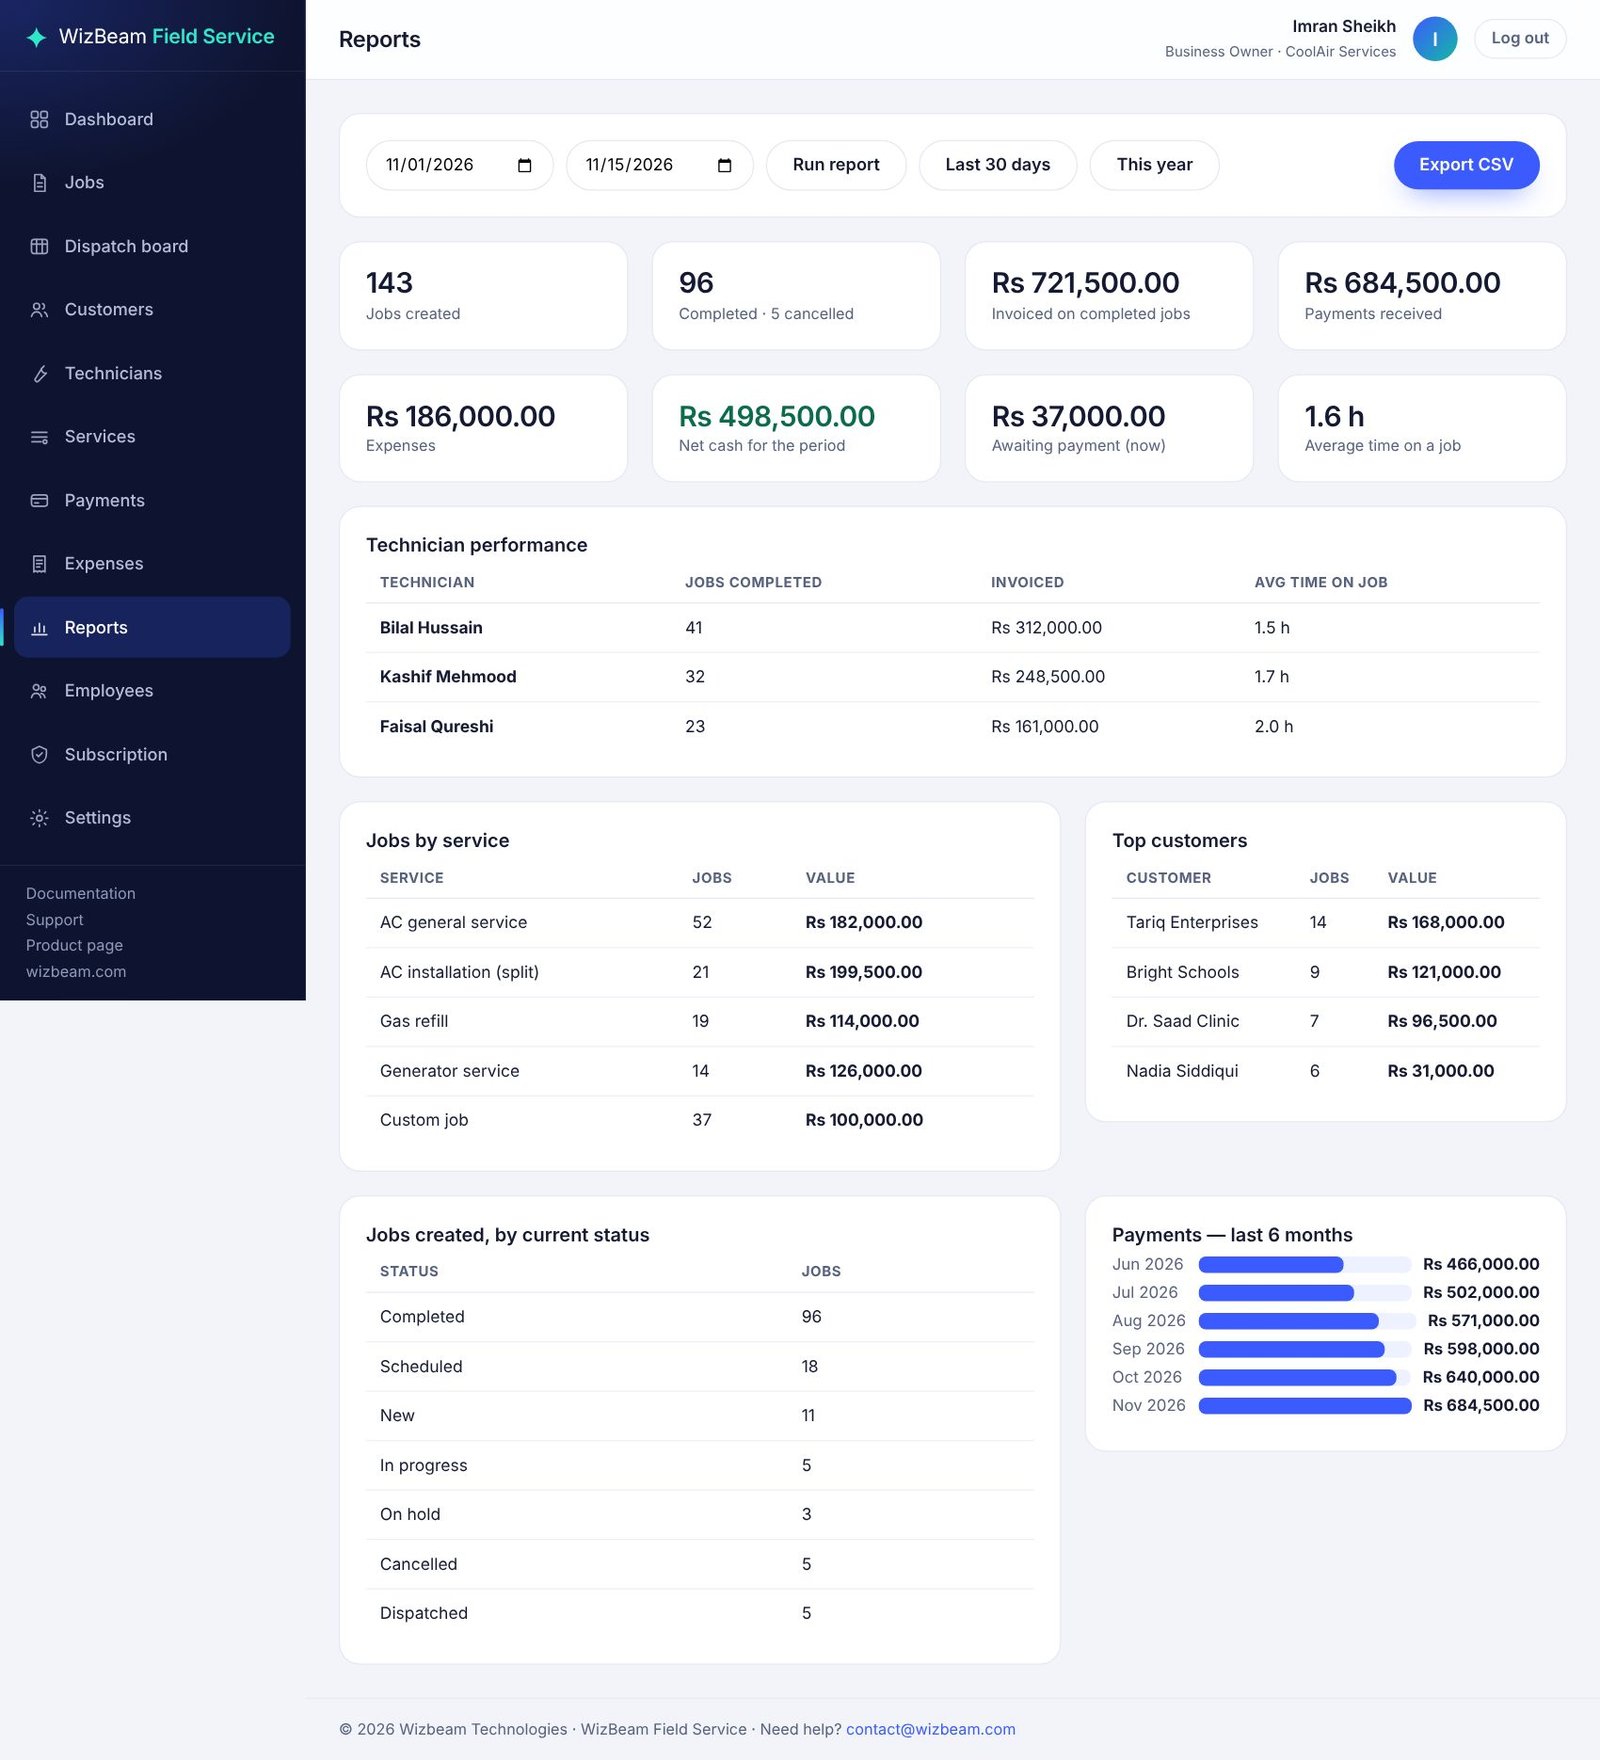
Reports covers any date range: jobs created, completed and cancelled, the amount invoiced on completed jobs, payments received, expenses, net cash, the amount still awaiting payment and the average time on a job. It also shows technician performance (jobs completed, amount invoiced, average time), jobs by service, your top customers and a six-month payments trend. CSV export is included with Professional and Enterprise.
White label: your own brand
White label lets you make WizBeam Field Service look like your own system — your name, logo and colours on every page, your own sign-in page, and your logo on printed documents. It is included in the Professional and Enterprise plans, and only the business owner can change it. Everyone else in the workspace sees the result.
Open White label in the menu. A preview on the right changes as you edit; click Save branding to apply it everywhere.
Name and tagline
The product name replaces “WizBeam Field Service” in the menu, the browser tab, the sign-in page and the footer. The optional tagline appears under your logo on the sign-in page.
Logo and browser icon
Upload a logo and a square browser icon (favicon) as PNG, JPG, WebP or GIF, up to 2 MB each. Pictures are checked and resized automatically (logo up to 800 × 300, icon 256 × 256); other kinds of file are refused. Choose whether the product name shows next to the logo, and tick white background if your logo is dark and your menu is dark. The icon is also used when someone adds the system to a phone home screen.
Colours and font
Pick a main colour (buttons, links and highlights), a menu colour (the side menu and the sign-in background — a light colour switches the menu text to dark) and an accent colour, or tick Use the standard colour. A main colour too light for white button text is refused, so buttons stay readable. You can also choose the font: Inter, the system font, a humanist sans or a classic serif.
Your own sign-in page
Choose a sign-in link name, for example acme-tools. Your sign-in page is then https://wizbeam.com/solutions/field-service-operations-management-system/acme-tools/ — share it with your team and bookmark it. It shows your logo, name, tagline, colours and your own welcome heading and message, and can hide the “create an account” and “back to the product page” links. Link names are unique, 3 to 40 characters, using lower-case letters, numbers and dashes; names already used by the system (such as login or dashboard) are not allowed.
Who can sign in where
Once your sign-in page is set, you and everyone in your team sign in only on it. If one of you tries the standard WizBeam sign-in page, the correct password is not accepted and the page shows your company’s sign-in address instead. Your page in turn accepts only people from your own account. A device that has opened your page goes straight to it next time, and signing out or an expired session brings people back to it. Someone from another company using the same device can click Use the standard sign-in under the form. If white label stops (for example the plan changes), everyone signs in on the standard page again until it returns.
Printed documents and statements
Your logo can print at the top of quotes, invoices and PDF customer statements, and you can add your own footer text such as payment terms, bank details or a thank-you note. Document headings and the statement table use your main colour.
Support details and hiding WizBeam
Add your own support email, phone and website; they appear in the menu and the footer of every page, with optional footer text of your own. Tick Hide WizBeam to remove our name, documentation and support links from the menu and footer, so the system looks entirely your own.
If the plan changes
Your saved branding is kept if the plan lapses or changes to one without white label. It stops showing until the plan includes white label again, then comes back by itself. Remove branding at the bottom of the page deletes it all and returns to the standard look.
WhatsApp messages and customer links
Send customers their job invoices, receipts and reminders on WhatsApp in one click. With your business number connected (see Send with one click below), the message is sent straight away from your number. Without it, WhatsApp opens on your phone or computer with the message already written and you press send — that needs no setup and works with WhatsApp and WhatsApp Business.
Who can send
Only the account owner sends WhatsApp messages. Other team members do not see the WhatsApp buttons; they can still see on Reminders who needs a message and when the last one went out.
Send with one click (connect your number)
Until you connect a number, a WhatsApp button opens WhatsApp with the message written and you press send. Once you connect your business number under WhatsApp in the sidebar, every button sends the message straight away from your number — WhatsApp does not open — and Reminders gets a Send to all button for each list.
- In Meta for Developers, create a Business app, add the WhatsApp product, and add and verify your business phone number. A new number is easiest: a number that is already in the WhatsApp app has to be moved to Meta's platform first.
- Copy the Phone number ID and the WhatsApp Business Account ID, and create a permanent access token for a System User with the whatsapp_business_messaging and whatsapp_business_management permissions.
- Add a payment method in WhatsApp Manager. Meta charges a small fee for each delivered business message, billed to your own Meta account.
- Paste the three details on the WhatsApp page and click Connect WhatsApp. The system checks them with Meta and submits its message templates for approval.
- When the templates show Approved (usually from a few minutes to a day — click Check approval), the buttons send directly. Use Send a test message to check.
WhatsApp only lets a business start a conversation with wording Meta has approved, so a connected number sends the standard approved messages shown on the WhatsApp page (with the customer link as a button) instead of the wording you edited. To see Delivered and Read next to each message, add the callback URL and verify token shown on the page as a webhook in your Meta app and save the App secret. The access token is stored encrypted. Disconnect returns to opening WhatsApp.
Where the buttons are
On a job, the bar above it has WhatsApp visit booked and WhatsApp technician on the way before the job is done, and WhatsApp invoice (or job completed) afterwards, plus a payment reminder while money is due. Every message can also be sent from Reminders. The page shows when a message was last sent.
The customer’s link
Invoice, receipt and reminder messages include a private link. The customer opens it on their phone without signing in and sees the document, what is paid and what is due, can print it or save it as a PDF, and sees How to pay — the bank and wallet accounts you added in Settings. The link is long and random, so nobody can guess another one.
The same bar has Copy link (to paste it anywhere), Customer view (to see what they see) and New link, which makes a fresh link and stops the old one working — use it if a link was sent to the wrong person.
Phone numbers
Numbers starting with 0 get your country code added automatically (92 for Pakistan, set under WhatsApp messages). Numbers starting with + or 00 are used as they are. If a customer has no phone saved, WhatsApp opens with the message and lets you pick the contact.
Change the wording
Owners and administrators can change every message under Reminders → WhatsApp messages — in English, Urdu or any language. Words in curly brackets are filled in for you: {name}, {business}, {number}, {amount}, {paid}, {due}, {date} and {link}. A sentence is left out when its value is empty. Use the standard text puts a message back.
Payment notices from customers
When a customer pays to your bank or wallet account, they can tell you from their link: under I have paid they enter the amount, which account they paid to, the transaction ID and, if they like, a screenshot of the payment.
What you see
A yellow Payment notice appears on a job and at the top of Reminders, with the amount, account, reference and screenshot (click it to open it full size).
What to do
- Check that the money arrived in your account.
- Record the payment on the invoice the usual way.
- Click Mark as recorded on the notice — or Not received if you could not find the payment.
A notice never changes your figures by itself, so nothing is counted until you have checked it. Screenshots are converted to plain pictures when uploaded.
Reminders
Reminders in the sidebar is your daily list of who to message, each with a WhatsApp button and the date it was last sent:
- Payment notices from customers — see Payment notices.
- Tomorrow’s visits — confirm each visit with the customer.
- Unpaid completed jobs — with the amount due.
Work down the list each morning. With your number connected, each button sends the message straight away and Send to all messages everyone in a list at once (people without a phone number are skipped); the Last sent column then shows Sent, Delivered, Read or Failed. Without a connected number, each button opens WhatsApp with the message ready. Only the account owner sees these buttons; others see the list and when each person was last messaged. The link at the top right, WhatsApp messages, is where owners and administrators change the wording.
Import from Excel or CSV
Bring your existing records in from Excel, Google Sheets or another system in one go instead of typing them. Open Import from Excel on the Customers page.
What you can import
Customers — name required; company, phone, email, address, city and notes are optional.
How it works
- Download the template if you are starting fresh — or use your own sheet; the first row must be the column names.
- Save it as Excel (.xlsx) or CSV and upload it. Up to 5,000 rows at a time.
- Match columns: columns with familiar names (Mobile, Cell, Price, Cost, DOB …) are matched automatically; check them and choose the rest.
- Check: you see how many rows are ready, how many are already in the system and which rows have problems — with the row number and what to fix.
- Click Import. The summary lists anything that was skipped.
Good to know
- Rows already in the system (same name and phone, or the same SKU for products) are skipped, so you can safely import the same file again after fixing problem rows.
- Dates can be written 2026-01-31 or 31/01/2026, or be real Excel dates.
- Format phone and barcode columns as Text in Excel so long numbers are not shortened.
- Your plan’s limits still apply — the check step tells you if only part of the file fits.
- Older .xls files must be saved again as .xlsx or CSV first.
Install the app on your phone or computer
You can install the system on a phone, tablet or computer so it opens from the home screen like an app, full screen and without the browser bar.
Android and computers (Chrome, Edge)
After signing in, click Install app at the top right (or use the browser menu → Install app / Add to Home screen).
iPhone and iPad
Open the system in Safari, tap Install app for a reminder, then tap the Share button and Add to Home Screen.
Good to know
- With white label, the app uses your company name, colours and icon, and opens on your own sign-in page.
- Long-pressing the app icon offers shortcuts to the most-used pages.
- Your data is never stored on the device — pages always come from the server. Without internet, the app shows a short “you are offline” page instead of an error.
- On phones, lists turn into easy-to-read cards, one per row.
Using it on a phone
- Tap the menu button (three lines, top left) to open the menu, and tap outside it to close it. In Arabic and Urdu the menu opens from the right.
- Lists show one card per row, with the column name beside each value. Totals such as subtotal, tax and total sit under the cards as simple lines.
- Invoices and statements fit the screen. If a document has a wide table, slide the table sideways with your finger; the rest of the page stays still.
- Every field is large enough to tap, and the phone does not zoom in when you start typing. Search boxes and dropdowns work with the phone keyboard: type part of a name, code or phone number.
- To print or keep a document, open it and tap Print / save as PDF. On Android and iPhone the print screen also offers Save as PDF and sharing.
- The EN button at the top changes the language for you only.
Online booking page
Give people a link where they can request a visit at any time of day — share it on WhatsApp, Instagram, Facebook, your Google Maps listing or your website. Owners and administrators set it up under Online booking in the sidebar; it is included in every plan.
Set it up
- Tick Booking page is on and choose a link name, for example
city-care. Your page is thenhttps://wizbeam.com/solutions/field-service-operations-management-system/book/?c=city-care. - Set your opening hours for each day (untick days you are closed), the time slot length, how many days ahead people can book and the minimum notice in hours.
- Optionally add a short message for the top of the page, then Save. Use Copy link or Share on WhatsApp to send it out.
What people see
- The customer chooses the service, describes the job, picks a preferred day and time of day (morning, afternoon or evening), and enters their name, phone and address.
- A new job is created with the status New and the preferred time, ready for you to confirm, assign a technician and dispatch. A returning customer is matched by name and phone.
The page uses your white label logo and colours when it is on, works well on phones, and limits repeated requests from the same connection. Untick Booking page is on to stop it at any time — the link then shows “not available”.
Roles & permissions: what each role can see and change
Roles & permissions in the sidebar is where the account owner creates the roles for the team. There are no built-in roles: you create the ones your business needs and decide exactly what each one can see and change. Only the owner sees this page, and it is included in every plan.
Create a role
- Click + Create a role and give it a name (for example “Technician”) and, if you like, a short description.
- For every feature, choose Hidden, View only or View and edit. Set all at the top changes every row at once.
- Tick or untick Allow downloads (CSV exports and PDF statements), and See every job — without it, a person sees only the jobs assigned to the technician profile linked to their sign-in.
- Click Create role, then give people the role on the Employees page.
Hidden, View only, View and edit
- Hidden — the feature disappears from their menu, and opening one of its pages directly sends them back to the dashboard.
- View only — they can open and read everything in it, but every form that would change something is removed, and any change they still try to send is refused with a message. A “View only” notice shows at the top of those pages.
- View and edit — they can add, change and delete there.
The dashboard is always visible. Your subscription, the team, these roles, white label and WhatsApp always stay with the owner.
Change, duplicate or delete a role
Click a role in the list to change it — the change applies to everyone with that role the next time they open a page, without signing out. Duplicate copies a role as a starting point for a similar one. A role can only be deleted when nobody has it; move those people to another role first.
Teams that existed before custom roles
Each existing team member was moved automatically into a role named after their old one (for example “Dispatcher”) with exactly the access they had before, including any limits you had set. Rename or adjust these roles whenever you like.
Checked on the server
The rules are checked on every page, not only hidden in the menu: a hidden feature’s pages are refused, view-only pages refuse every change (also changes sent from another page), and downloads are refused without the downloads permission.
Request a feature
Request a feature in the sidebar is where anyone in your account can suggest a new feature, an improvement, a report, a connection with another app or anything else that would help. Every request is read by the WizBeam team.
Send a request
- Open Request a feature.
- Write your idea in one line, choose its type and how important it is for you.
- Describe what you are trying to do, what happens today and what would help, then click Send request.
Follow its status
Your requests are listed beside the form with their status — Received, Under review, Planned, In progress, Released or Not planned — and any reply from the WizBeam team. The account owner sees the requests of the whole team; everyone else sees their own. When white label hides WizBeam from your team, only the owner sees this page.
Plans and limits
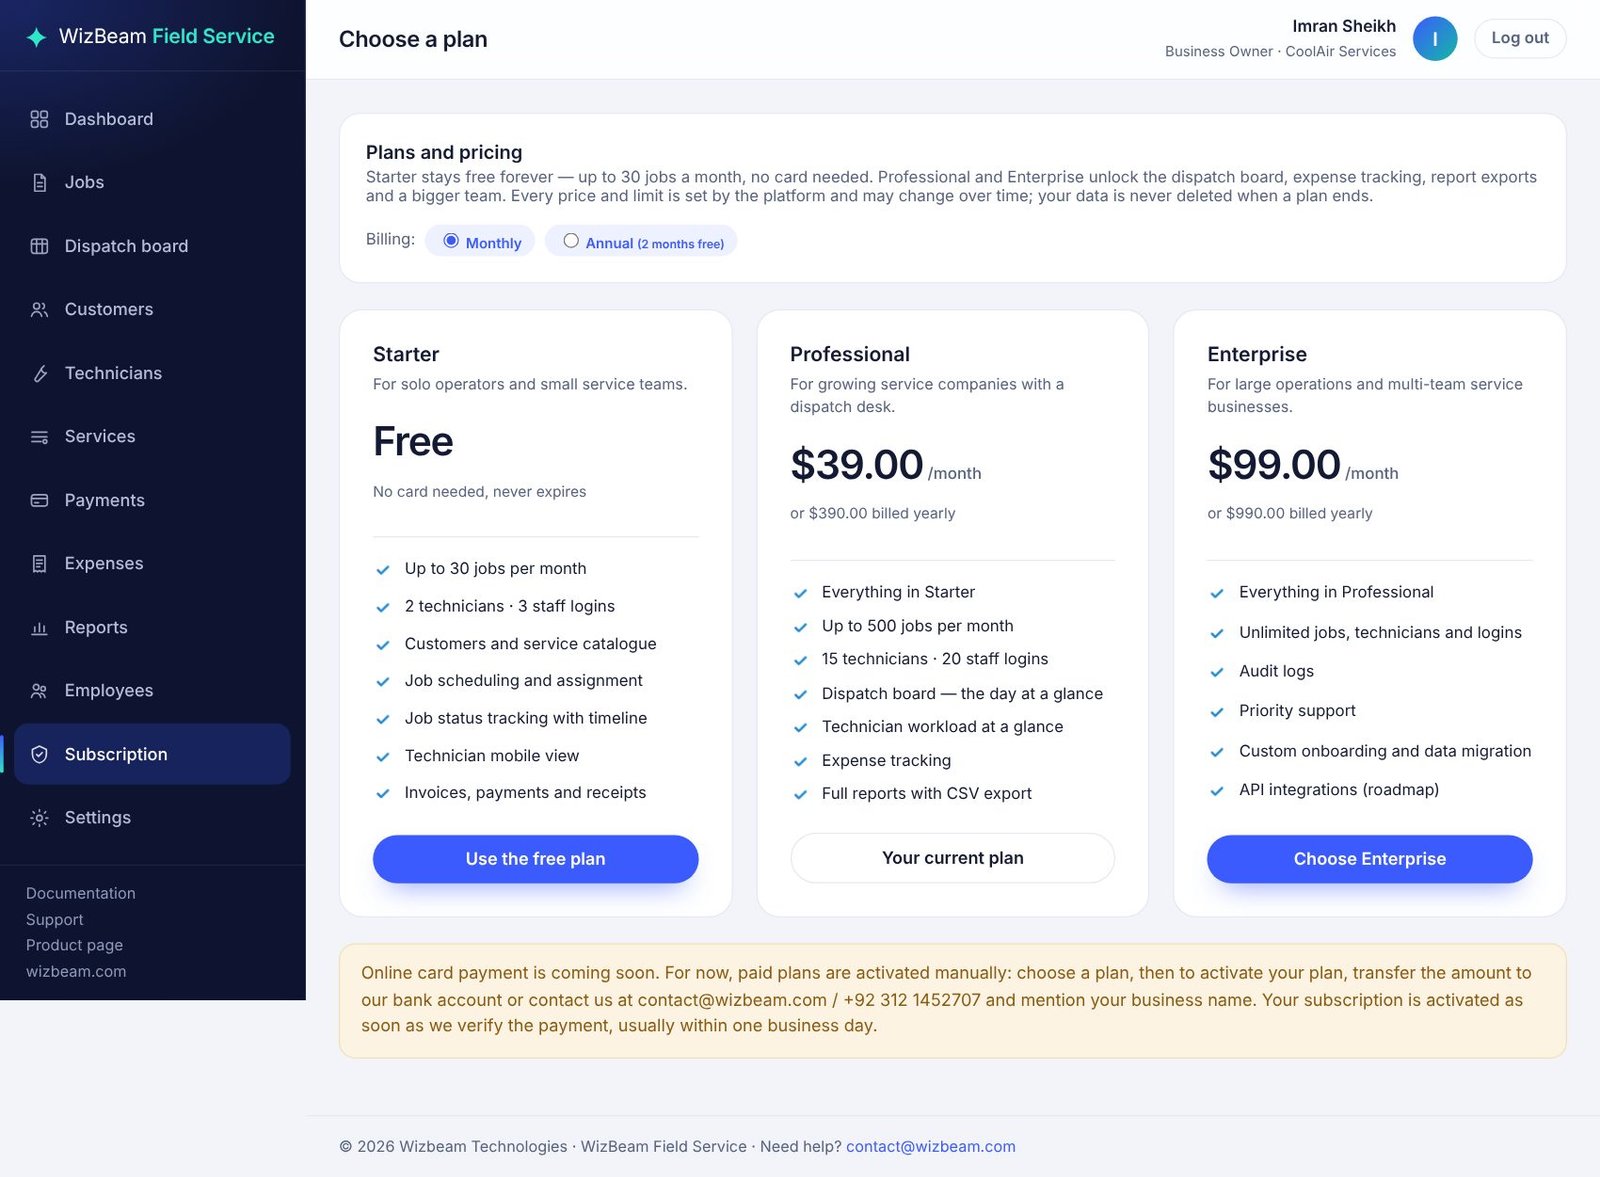
| Plan | Price | Jobs per month | Technicians | Staff logins | Includes |
|---|---|---|---|---|---|
| Starter | Free | 30 | 2 | 3 | Jobs, scheduling, customers, services, technician logins, quotes and invoices, payments, basic reports |
| Professional | $39 / month or $390 / year | 500 | 15 | 20 | Everything in Starter plus the dispatch board, expense tracking, report export and white label |
| Enterprise | $99 / month or $990 / year | Unlimited | Unlimited | Unlimited | Everything in Professional, for large operations, with priority support |
The job limit counts jobs created in the current calendar month and resets on the 1st. Double-booking protection applies on every plan. Current prices are always shown on the product page.
Upgrading and paying for a plan
The owner or an administrator manages the plan from Subscription in the sidebar.
- Open Subscription → Plans and choose a plan and a billing cycle (monthly, or yearly with two months free).
- The page shows payment instructions and your request is recorded as pending. Send the payment and keep the reference.
- Our team verifies the payment — usually within one business day — and your plan becomes active with its expiry date. Nothing is activated automatically from a link or a screenshot.
Renewal, expiry and grace period
The Subscription page shows when your plan expires. If it is not renewed, a short grace period applies during which everything keeps working and a reminder is shown on every page. After the grace period you are taken to the plan page to renew or choose another plan before continuing. Your data is never deleted when a plan expires.
Plan prices are shown in US dollars. Refunds follow our Refund Policy, including a 7-day money-back guarantee on a first paid subscription.
Languages
WizBeam Field Service works in six languages: English, العربية (Arabic), اردو (Urdu), Español, Français and Türkçe. Arabic and Urdu are shown right to left, with the menu on the right.
How the language is chosen
The first time someone opens WizBeam Field Service, the language follows the country they are in (for example Arabic in Saudi Arabia, the UAE or Egypt, Urdu in Pakistan, Spanish in Spain and Latin America, French in France and French-speaking Africa, Turkish in Turkey), and otherwise the language of their browser. Everyone else sees English.
Change the language
Use the language menu at the top of every page (and on the sign-in page). The choice is saved to the person’s account, so it follows them to any phone or computer they sign in on, and each team member can use a different language in the same workspace.
Daily summary
Every morning, Daily summary emails you one short message about yesterday and today, so you know where things stand before you open the app.
What it shows
Yesterday: jobs completed and their value (compared with the same day last week), payments received, new jobs and expenses. Today: how many jobs are scheduled, the first time, and how many each technician has. Needs attention: jobs today or tomorrow without a technician, jobs past their date and not started, jobs on hold, unpaid completed jobs and monthly bills that need this month's amount.
Who gets it
- The account owner gets it automatically, at 08:00 (Pakistan time) unless they change it.
- Anyone else who can see Reports can switch it on for themselves.
- Each person picks their own time and time zone on the Daily summary page in the menu, and can switch it off there at any time. Every email also has a link to that page.
Good to know
- It is written in the language you use the app in.
- A quiet day (nothing happened and nothing is waiting) is skipped, unless you tick Send it on quiet days too.
- The page shows a live preview, and Send me one now sends yesterday's summary straight away (up to 3 times an hour).
- It arrives at most once a day.
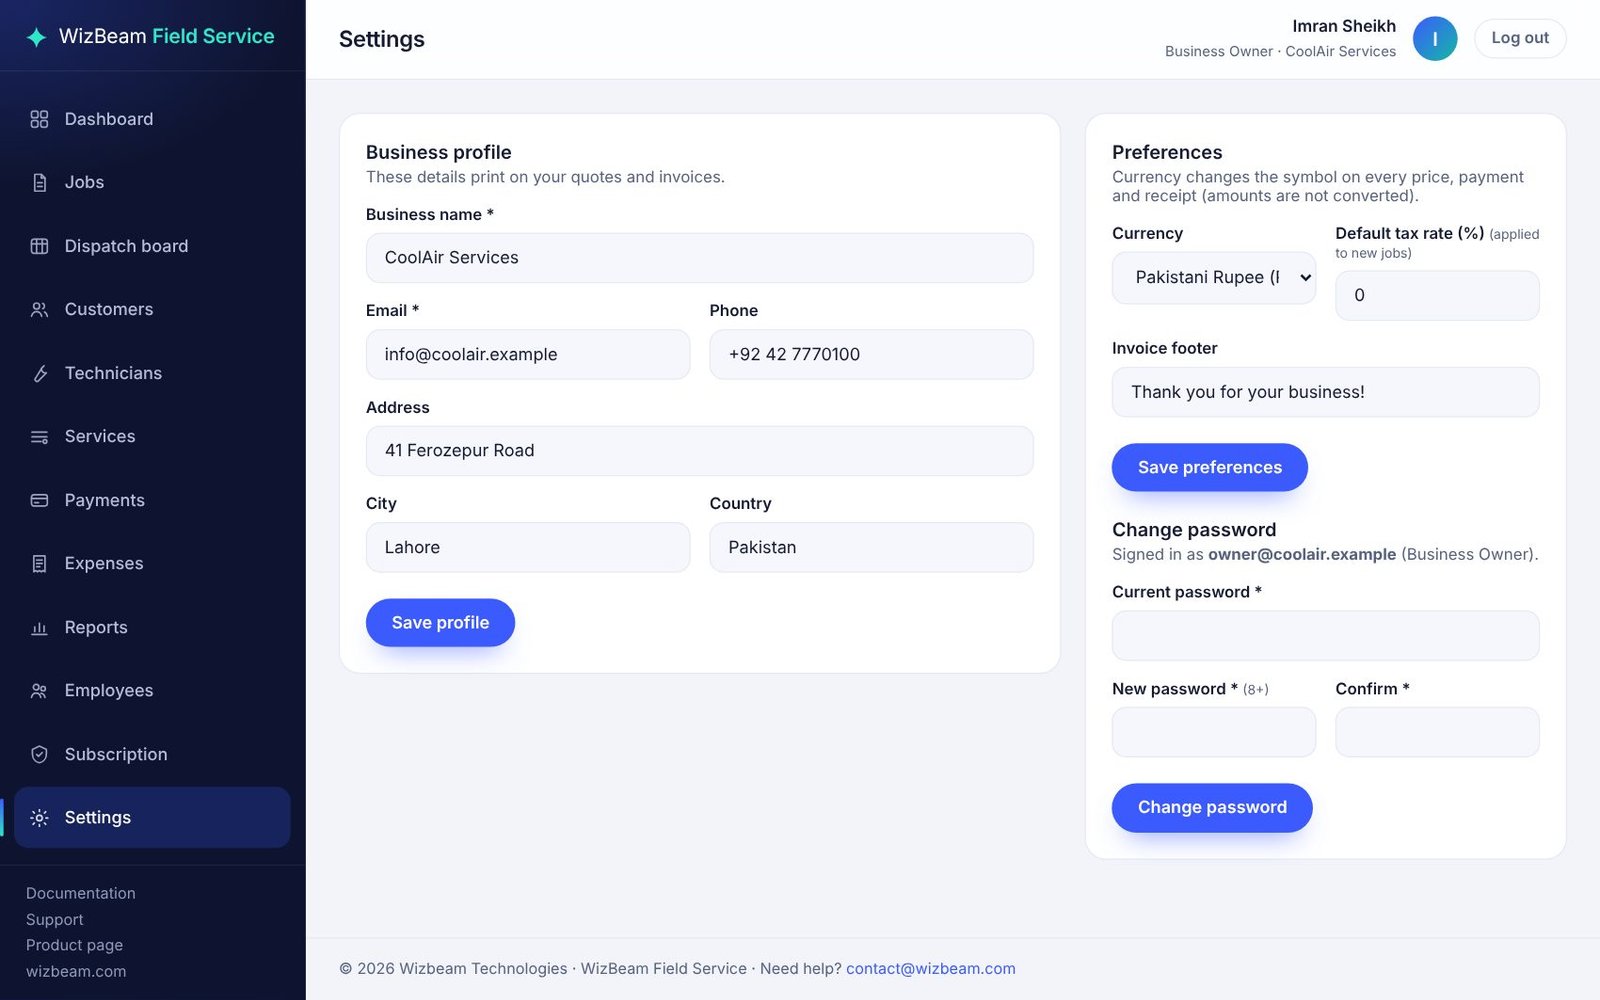
Settings and currency
Settings (owner and administrators) has four parts:
- Business profile — name, email, phone, address, city and country. These print on quotes, invoices and statements.
- Preferences — your currency. Pick it once and every price, payment and report shows that symbol. Amounts are not converted; only the symbol changes. You can also set a default tax rate applied to new jobs and an invoice footer for payment terms or bank details.
- Change password — for the account you are signed in with.
- Banks & wallets — the accounts that transfer and wallet payments are received in. See Banks and wallets.
Data, privacy and security
- Your data is isolated. Every record belongs to your account; another business can never see it.
- Role-based access. Each person signs in with their own account and sees only what their role allows.
- Passwords are stored hashed, never in readable form, and repeated failed sign-ins are temporarily blocked.
- Customer phone numbers stay private — quotes, invoices, statements and the jobs report show the customer's name, company and city only.
- Important actions are logged with the user and time.
- You own your data. Lists and reports export to CSV, which opens in Excel or Google Sheets.
Good habits: give every team member their own login rather than sharing one, deactivate accounts when someone leaves, and use a password you do not use elsewhere. See our Privacy Policy and Terms & Conditions.
Troubleshooting and FAQ
A technician cannot see any jobs
Their login is not linked to a technician profile. Edit the profile under Technicians and choose their login in Linked login.
The system refuses a time slot
That technician already has a scheduled, dispatched or in-progress job overlapping the slot. Choose another time or technician, or shorten the duration.
I cannot create a job
Your plan's monthly job limit is reached. It resets on the 1st, or you can upgrade.
I cannot cancel a job
A job with a payment recorded cannot be cancelled, so that money received always has a job behind it.
A total will not go down
An invoice total cannot be reduced below the amount already paid.
The customer paid for more than one job
Record the full amount on any of their unpaid jobs. The extra pays their other unpaid jobs, oldest first. See Payments larger than the job.
It asks which bank or wallet received the money
You chose Bank transfer or Online / wallet and have banks or wallets set up. Pick the one the money went into.
I cannot deactivate a technician
They still have active jobs. Re-assign those jobs first.
I forgot my password
Ask your account owner to open your name on the Employees page and click Email a password link; you then choose a new password from the email. If you are the owner, contact support@wizbeam.com from your registered email address.
A page says I do not have permission
Your role does not include that feature, or gives you view only. Ask the account owner to change your role on Roles & permissions.
I did not receive the verification code when signing up
Check your spam folder, wait a minute and click Send a new code. If the address was wrong, click Use a different email. Each code works for 30 minutes; after 5 wrong tries, fill in the form again.
My invitation link says it cannot be used
The link has expired (invitations last 3 days, password links 24 hours), was already used, or a newer one was sent. Ask the account owner to click Resend invitation or Email a password link on the team page.
How do I contact support?
Open a ticket in the support centre. Sign in there with the same email and password you use for WizBeam Field Service — you do not need to create another account. You can also email support@wizbeam.com.
Still need help?
Open a private ticket in the support centre — sign in with your WizBeam Field Service email and password, no second account needed — or email support@wizbeam.com.
Screenshots show a demonstration account with sample data. Last updated 17 November 2026.